MPE Setup on Erae 2: Ableton, Logic, Bitwig, Cubase & Reaper
Erae 2 sends full MIDI Polyphonic Expression (MPE) over a dedicated USB MIDI cable. This guide walks through the setup in the most common DAWs. Two steps are always required first: enable MPE in Erae Lab and point your DAW to the correct port. After that, each DAW has a short one-time toggle to unlock per-note expression.
Note: Not familiar with MPE? Start with What Is MIDI MPE? for a plain-language explanation of pitch, slide, and pressure per note.
Before you start (all DAWs)
These three steps apply regardless of which DAW you use. If any one is missing, MPE will not work.
Step 1: Enable MPE on your keyboard element in Erae Lab
-
Open Erae Lab and select your project.
-
Click the keyboard element on the canvas (the isomorphic or chromatic keyboard pad you want to play expressively).
-
In the right panel, find the MIDI section and tick the MPE checkbox.
When MPE is switched on, Erae Lab automatically sets:
- Pitchbend range to 48 semitones
- Nb channel (number of member channels) to 7
Leave these defaults unless you have a specific reason to change them.
-
Under Master channel, choose Channel 1 (lower zone, the standard choice) or Channel 16 (upper zone). Those are the only two options; Channel 1 is correct for most synths.
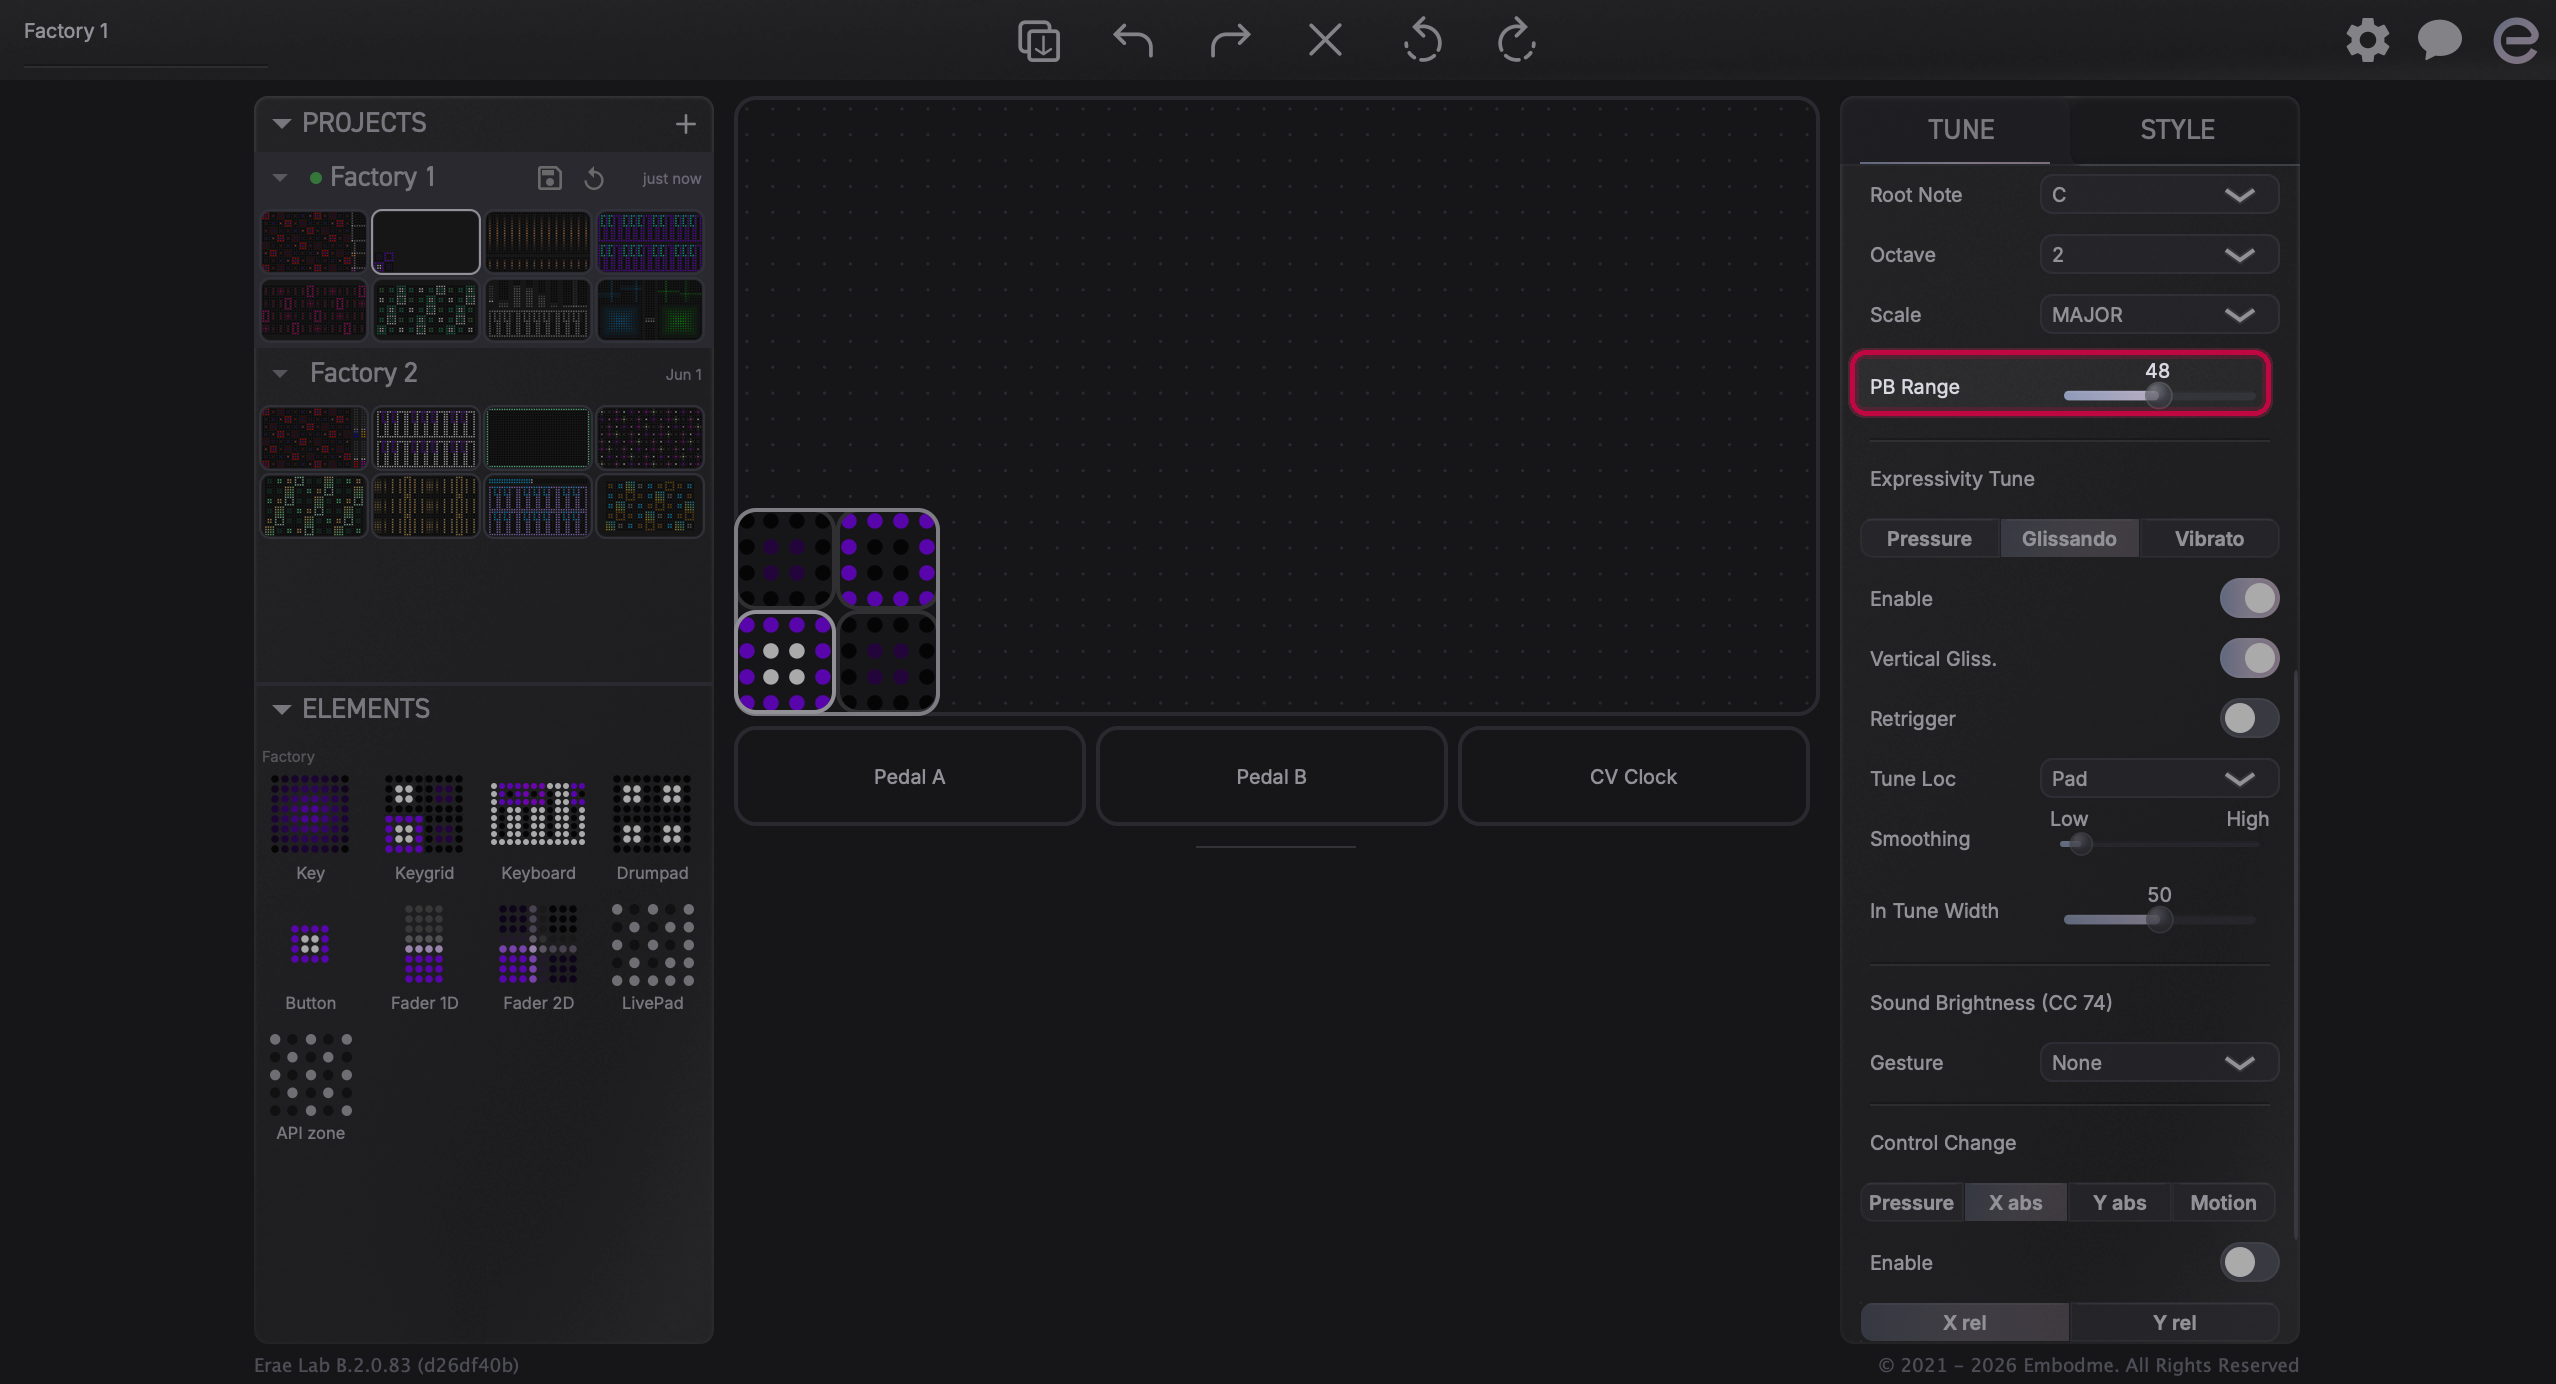
Note: The CC74 (Slide / Timbre) field only appears in the MIDI section after MPE is enabled. That is expected: CC74 is the MPE slide axis and is only relevant in MPE mode.
- Push the project to your Erae 2 (click the sync button in Erae Lab, or enable auto-save if your version supports it).
Step 2: Choose the right USB port in your DAW
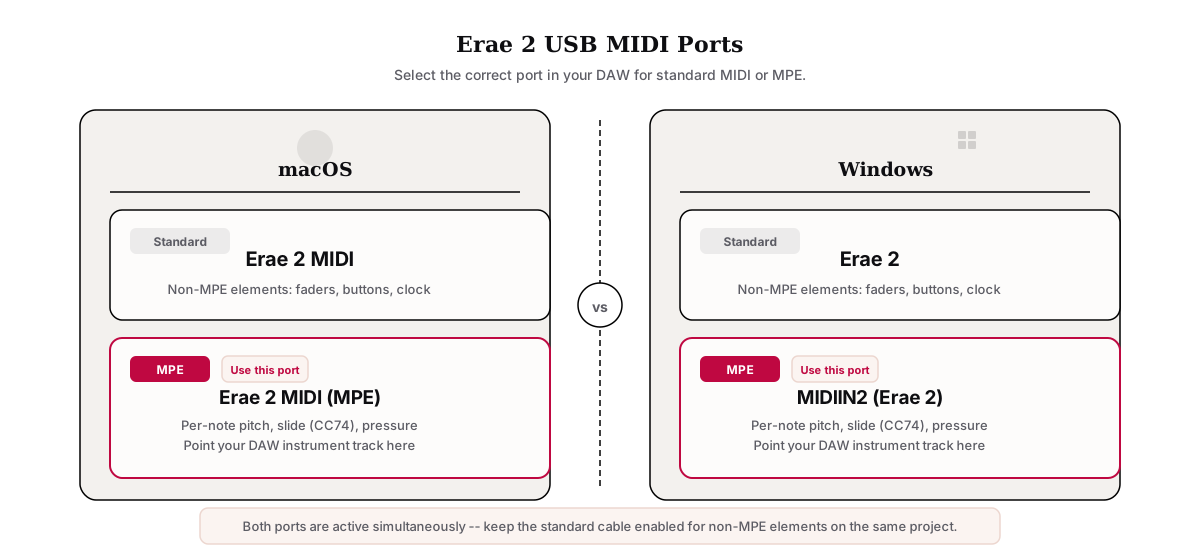
Erae 2 shows up as two separate MIDI ports in your DAW:
| macOS port name | Windows port name | |
|---|---|---|
| Standard MIDI (non-MPE elements, clock) | Erae 2 MIDI | Erae 2 |
| MPE / expressive MIDI | Erae 2 MIDI (MPE) | MIDIIN2 (Erae 2) |
For MPE, you need the second port: the one labelled (MPE) on macOS, or MIDIIN2 (Erae 2) on Windows. The standard cable stays available for non-MPE elements (faders, buttons, etc.) on the same project.
Step 3: Match the pitchbend range in your synth
Erae 2 sends pitchbend spanning 48 semitones (±24 semitones) when MPE is enabled. Your synth or VSTi must be set to the same range, or horizontal finger movement will produce the wrong pitches. This is the single most common reason MPE pitch sounds "off" after a correct setup.
Note: Most MPE-aware synths let you set pitchbend range in their MPE configuration panel. Set it to 48 (or ±24) to match Erae Lab's default.
1. Ableton Live
Warning: Ableton Live automatically reroutes all incoming MIDI to channel 1 for VST/AU instruments unless the instrument track has MPE explicitly enabled. This silently removes per-note expression even when Erae 2 is sending correct MPE data. Enabling the MPE toggle on the track is mandatory.
Enable the MPE cable in Ableton preferences
- Open Ableton Preferences (Cmd+, on macOS / Ctrl+, on Windows) and go to Link / Tempo / MIDI.
- Under MIDI Inputs, find
Erae 2 MIDI (MPE)(macOS) orMIDIIN2 (Erae 2)(Windows). - Turn Track on for that row. You do not need Remote or Sync for MPE.
- The standard cable (
Erae 2 MIDI/Erae 2) can remain enabled if you have non-MPE elements on the same project; disable it if you want a clean MPE-only signal.
Enable MPE on the instrument track
- Create or select an instrument track.
- In the track header, set the MIDI From source to
Erae 2 MIDI (MPE)(macOS) orMIDIIN2 (Erae 2)(Windows). - Enable the MPE toggle on the track. Without this, Ableton remaps everything to channel 1 and expression is lost. The toggle is in the track header area when an MPE-capable instrument is loaded.
Load an MPE-capable instrument
Use a synth or VSTi with MPE support, for example Drift, Max for Live MPE devices, or a third-party MPE VST. Standard instruments that do not support MPE will still receive notes but will ignore per-note pitch, slide, and pressure even with the toggle on.
Verify
Touch the keyboard pad and confirm MIDI activity appears in Ableton's MIDI indicator. While holding a note, move your finger vertically (slide/CC74) and horizontally (pitchbend): the instrument should respond to each independently.
2. Logic Pro
Logic Pro has supported MPE natively since version 10.5. No custom scripts or additional downloads are needed.
Enable the MPE port in Logic
- Open Logic > Settings > MIDI (Logic 10.7+) or Preferences > MIDI on older versions.
- Confirm
Erae 2 MIDI (MPE)is listed. If it is missing, quit Logic, check that macOS System Information shows both Erae 2 MIDI ports, then reopen Logic.
Create a software instrument track and route it
- Add a Software Instrument track.
- In the Track Inspector (left panel), set the MIDI input to
Erae 2 MIDI (MPE). - Logic auto-detects the MPE format when the MPE-designated port is used as input.
Choose an MPE instrument
Alchemy is Logic's primary MPE instrument and responds to all three axes out of the box. Sculpture also responds to per-note pressure. Third-party MPE VSTs work the same way.
Verify per-note expression
In Alchemy, confirm the MPE panel shows active status. Play a note and apply vertical finger movement (Slide) and horizontal movement (pitchbend): each should move independently.
Note: Logic on iPad uses Core MIDI. The same two-port model applies. Enable both
Erae 2 MIDIports in your iPad host app's MIDI settings (e.g. AUM, GarageBand).
3. Bitwig Studio
Warning: Adding Erae 2 as a Generic MIDI controller in Bitwig does NOT enable MPE. You must add it as a Generic MPE controller or the dedicated Erae entry, then set the instrument channel to "MPE" (not "All"). This is the most-reported Bitwig setup mistake.
Add the MPE controller
- Open Dashboard > Settings > Controllers.
- Click + to add a new controller.
- Do not select Generic MIDI controller. Instead, select Generic MPE controller (or the dedicated Erae entry if available).
- Set the MIDI input to
Erae 2 MIDI (MPE)(macOS) orMIDIIN2 (Erae 2)(Windows).
Add the standard cable (optional)
If your project also has non-MPE elements (faders, buttons), add a second controller entry: this time a Generic MIDI controller pointed at Erae 2 MIDI (macOS) or Erae 2 (Windows). Bitwig treats each cable as a separate controller.
Enable MPE on the instrument
- Open your instrument plugin.
- In the instrument's MIDI settings, set Channel to MPE, not "All". The "All" setting does not enable polyphonic expression.
Verify
The note input indicator should show activity. Pressure, slide (CC74), and pitchbend should each respond independently per finger.
Note: If the MPE option is greyed out or absent, that instrument does not support MPE. Try Bitwig's built-in Polymer synthesizer, which has full MPE support.
4. Cubase (version 12 and later)
Cubase added native MPE support in version 12. Earlier versions have limited or no MPE handling: if you are on Cubase 11 or below, upgrade or use standard single-channel MIDI instead.
Confirm the port is active
- Open Studio > Studio Setup and go to the MIDI section.
- Confirm
Erae 2 MIDI (MPE)(macOS) orMIDIIN2 (Erae 2)(Windows) appears in the MIDI port list and is active.
Create an instrument track and route it
- Create an Instrument track and load an MPE-capable VSTi. HALion Sonic 7 and later support MPE; third-party MPE VSTs also work.
- In the track's Inspector, set the MIDI input to the MPE cable.
Enable MPE in the VSTi
In the instrument UI, look for an MPE or MIDI Polyphonic Expression toggle and enable it. Each VSTi exposes this in a different location, so check the instrument's manual if it is not visible in the main panel.
Match the pitchbend range
Cubase may allow you to set pitchbend range per-track in the Inspector. Set it to 48 semitones to align with Erae Lab's auto-set value.
5. Reaper
Reaper does not have a dedicated MPE track type. Instead, it passes raw multi-channel MIDI directly to VSTi plugins, and the plugins handle per-note expression internally. This means setup is simpler than in Ableton, since there is no MPE toggle to find, but it also means expression only works if the VSTi itself understands MPE.
Enable the port in Reaper preferences
- Open Preferences > MIDI Devices.
- Find
Erae 2 MIDI (MPE)(macOS) orMIDIIN2 (Erae 2)(Windows) and enable it as a MIDI input.
Add an MPE VSTi and set the track input
- Create a track and insert an MPE-capable VSTi (for example Pianoteq in MPE mode, Surge XT with MPE enabled, or similar).
- In the track's I/O settings, set MIDI receive to the MPE cable. Set Channel to All: Reaper forwards all channels to the VSTi, and the VSTi handles per-channel expression internally.
Enable MPE in the VSTi
Inside the VSTi UI, enable its MPE mode. Each plugin exposes this differently, so check the instrument's documentation.
Note: Reaper does not show a per-note channel MIDI activity indicator by default. To confirm MPE data is arriving correctly, insert a MIDI monitor plugin (such as MIDI Examiner) on the same track and check that you see multiple channels with pitch, pressure, and CC74 activity.
MPE axes: what Erae 2 sends
Erae 2 sends three independent axes per touch, each on its own MIDI member channel:
| Axis | MIDI message | Description | Configurable in Lab |
|---|---|---|---|
| Pitch (X) | Pitchbend per note | Horizontal finger movement; range 48 semitones | Yes (pitchbend range, vibrato gesture) |
| Slide (Y) | CC74 per note | Vertical finger movement (up/down); also called Timbre or Brightness | Yes (Y-relative, Y-absolute, or disabled) |
| Pressure (Z) | Channel Pressure per note | How hard you press | Fixed (sensor-driven) |
Note: If an axis is not responding, the most common reason is that the synth has MPE data mapped to nothing by default. Check the synth's modulation matrix and assign the axis (pressure, slide, pitchbend) to an audible parameter.
Troubleshooting checklist
- MPE ticked in Erae Lab? Select the keyboard element, check the right panel > MIDI section. The MPE checkbox must be on and the project pushed to the device.
- DAW receiving from the MPE cable? macOS:
Erae 2 MIDI (MPE). Windows:MIDIIN2 (Erae 2). A common mistake is leaving the DAW pointed at the standard cable (Erae 2 MIDI/Erae 2). - Ableton: MPE toggle on the instrument track? Without it, Ableton collapses all channels to channel 1 silently.
- Bitwig: controller added as Generic MPE controller? Generic MIDI controller does not expose MPE, so it must be re-added if you chose the wrong type.
- Instrument supports MPE? Non-MPE instruments receive notes on channel 1 only; per-note expression is silently discarded.
- Pitchbend range set to 48 semitones in your synth? A mismatch makes pitch expression sound off but does not prevent notes from playing.
- Any MIDI activity at all? Use a standalone MIDI monitor or a DAW MIDI monitor plugin pointed at the MPE cable. If no data arrives there, the issue is on the Erae/Lab side. If data arrives but expression is flat, the issue is the DAW or synth configuration.
- Erae Lab open at the same time? Lab coexists safely with a DAW: it uses its own vendor SysEx channel and leaves the two user MIDI cables free for the DAW.
FL Studio
FL Studio's MPE support is limited in current releases. Erae 2 works as a standard MIDI controller in FL Studio, but per-note expression (pitch, slide, and pressure per touch) is not reliably supported. If MPE expressivity is important to your workflow, Bitwig and Logic offer the most complete support.
Related: What Is MIDI MPE? | Erae Lab Tune Tab: MIDI, Expressivity & Configuration | Assigning MIDI Control Change (CC) in Erae Lab