Erae Lab Overview
Erae Lab is the free desktop app you use to build, customize, and manage your Erae layouts. It runs on macOS, Windows, and Linux and works with both the Erae Touch and the Erae 2. You connect the Erae to your computer via USB and use Lab to drag elements onto a canvas, dial in MIDI and expressivity settings, and push the result to the device.
This article walks through every section of the Lab interface so you know where to find things.
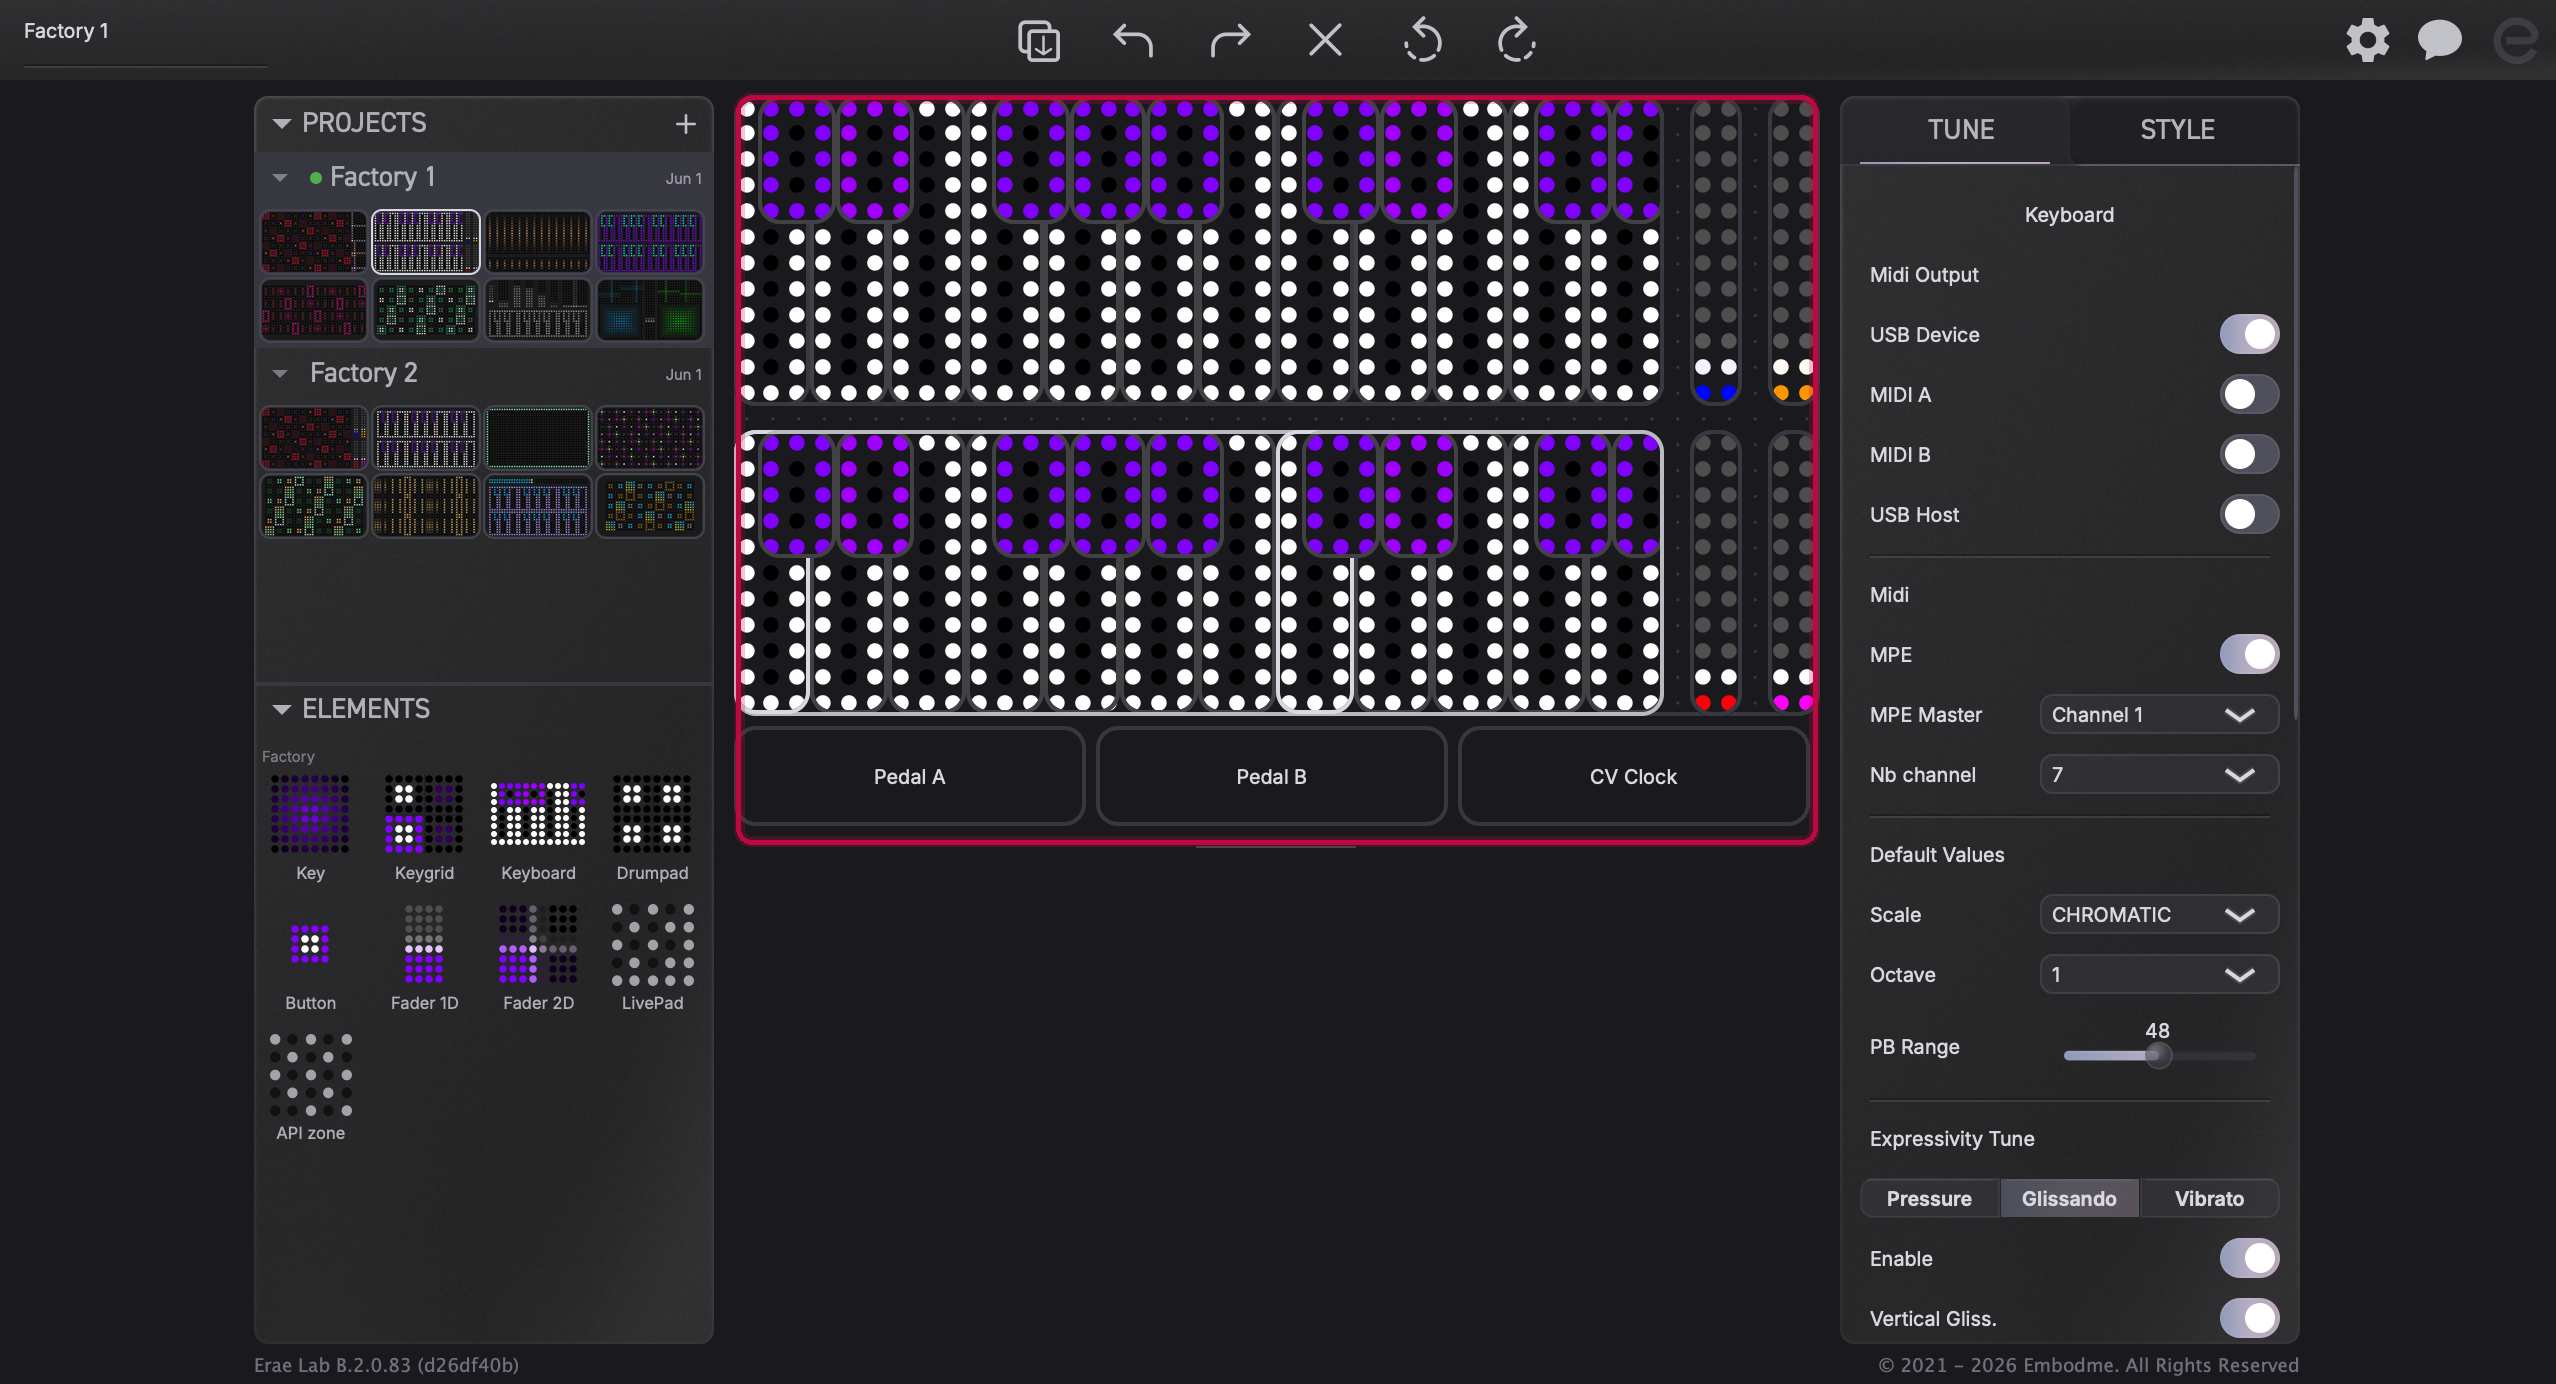
The main areas at a glance
The Lab window is organized into five zones:
| Zone | What it does |
|---|---|
| Top bar | Connection status, Live mode toggle, settings and gear menu |
| Left sidebar | PROJECTS, ELEMENTS, and (if enabled) SWATCHES panels |
| Center canvas | Visual layout editor: drag, resize, and arrange elements here |
| Right panel | TUNE and STYLE tabs, for per-element configuration |
| Bottom bar | App version and connection status string |
Top bar

The top bar runs across the full width of the window.
- Connection indicator: the "E" icon shows whether a device is recognized. When the Erae is connected the icon lights up and shows the firmware version; when nothing is plugged in the icon stays grey.
- Live mode toggle: switches the canvas between Edit mode (design layouts freely) and Live mode (interact with elements in real time on screen, mirroring what the device receives). Use Live mode to test touch response without a connected device.
- Gear icon: opens the settings menu, including Lab preferences, the firmware update trigger, and plugin/ReWire control.
Left sidebar: PROJECTS, ELEMENTS, SWATCHES
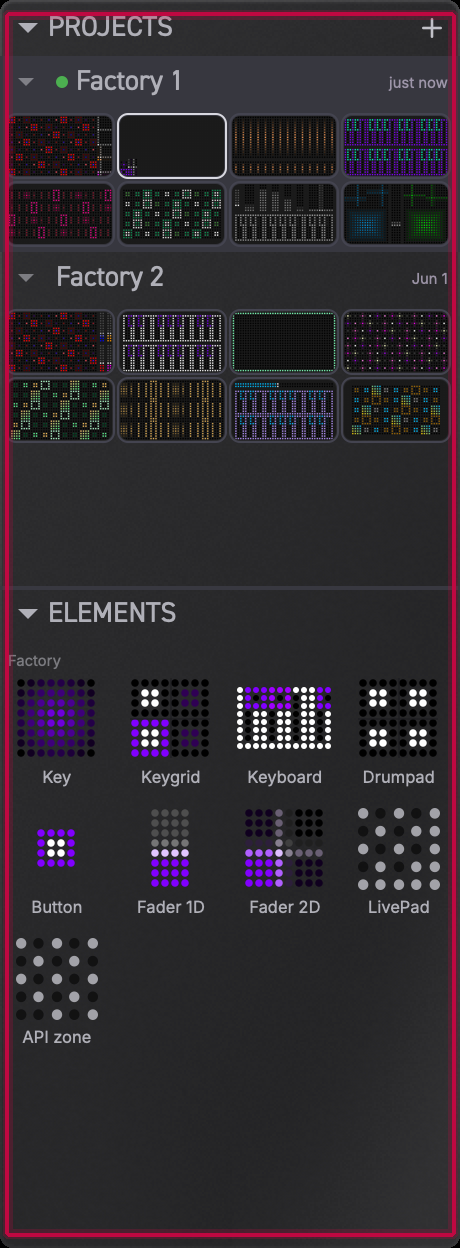
The sidebar has collapsible sections. Click a section header to expand or collapse it.
PROJECTS
This is where all your saved layouts live. Each project holds up to eight layouts (Erae 2) or up to 32 layouts (Erae Touch). You can:
- Create a new project with the + button.
- Switch between projects by clicking their name.
- Save, revert, or delete projects from the context menu (right-click or the three-dot icon).
- Push a layout to the device using the sync button. Changes made in Lab are not automatically sent to the device; you need to sync explicitly.
Note: Layout changes are stored locally in Lab until you sync them. If you close a project without pushing to the device, the Erae will still have the previous version.
ELEMENTS
The ELEMENTS section shows all the building blocks you can drag onto the canvas:
- Keys: single touch pads, each independently assignable to a MIDI note, CC, program change, or CV output.
- Keyboards: multi-key grids in isomorphic, chromatic, or drumpad layouts.
- Faders (1D and 2D): continuous linear or XY controllers.
- Buttons: momentary or latching triggers for notes, CCs, program changes, or tap tempo.
- Pedal: configuration zone for a connected sustain, expression, or footswitch pedal.
- API Zone: exposes raw finger-position data for custom software integrations (Erae 2 only).
To add an element, drag it from the ELEMENTS section onto the canvas.
SWATCHES
The SWATCHES section (when visible) lets you save and reuse color presets across elements.
Center canvas
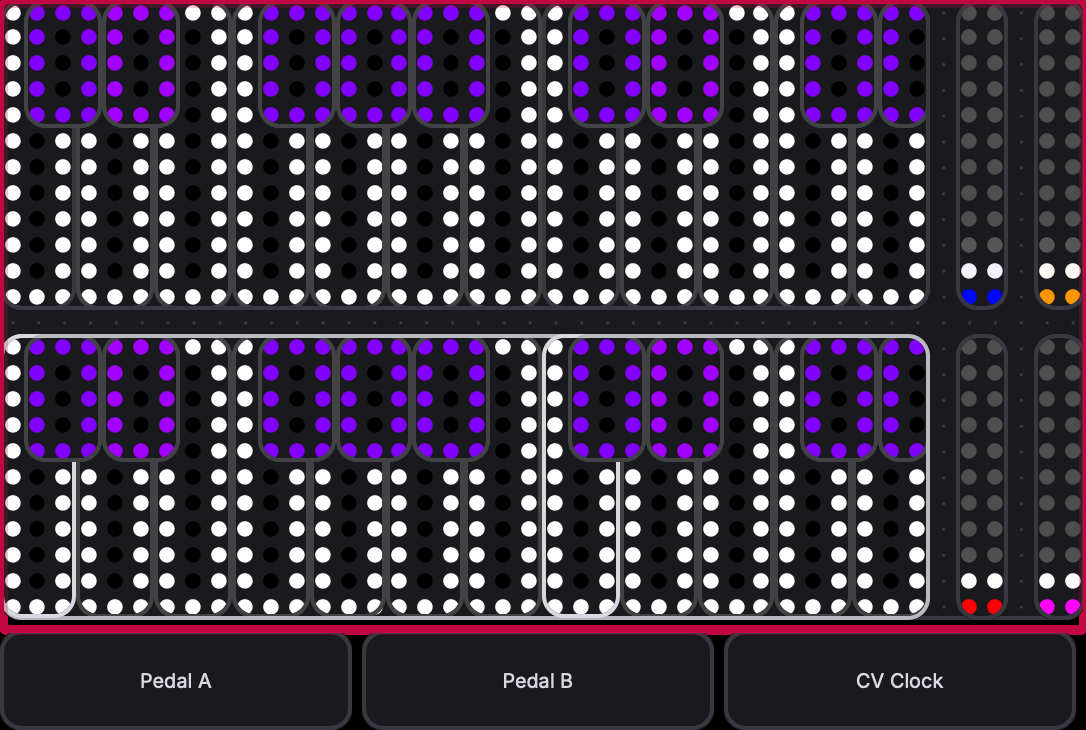
The canvas is the visual editor for your current layout. It shows a scaled representation of the Erae surface (the LED grid you touch). Elements snap to a grid that matches the physical pad positions.
- Drag to move elements anywhere on the canvas.
- Drag corners or edges to resize elements (most element types support variable sizing).
- Click to select an element. The right panel immediately loads that element's settings.
- Shift-click or drag-select to select multiple elements at once; the right panel switches to a multi-select mode showing shared properties.
The canvas only shows the current layout. Use the PROJECTS section to switch between layouts.
Right panel: TUNE and STYLE tabs
Selecting an element activates the right panel. It has two tabs: TUNE and STYLE. Every element type has its own dedicated panels; there is no single universal panel. What you see depends on which element is selected.
TUNE tab: MIDI, CC, and expressivity
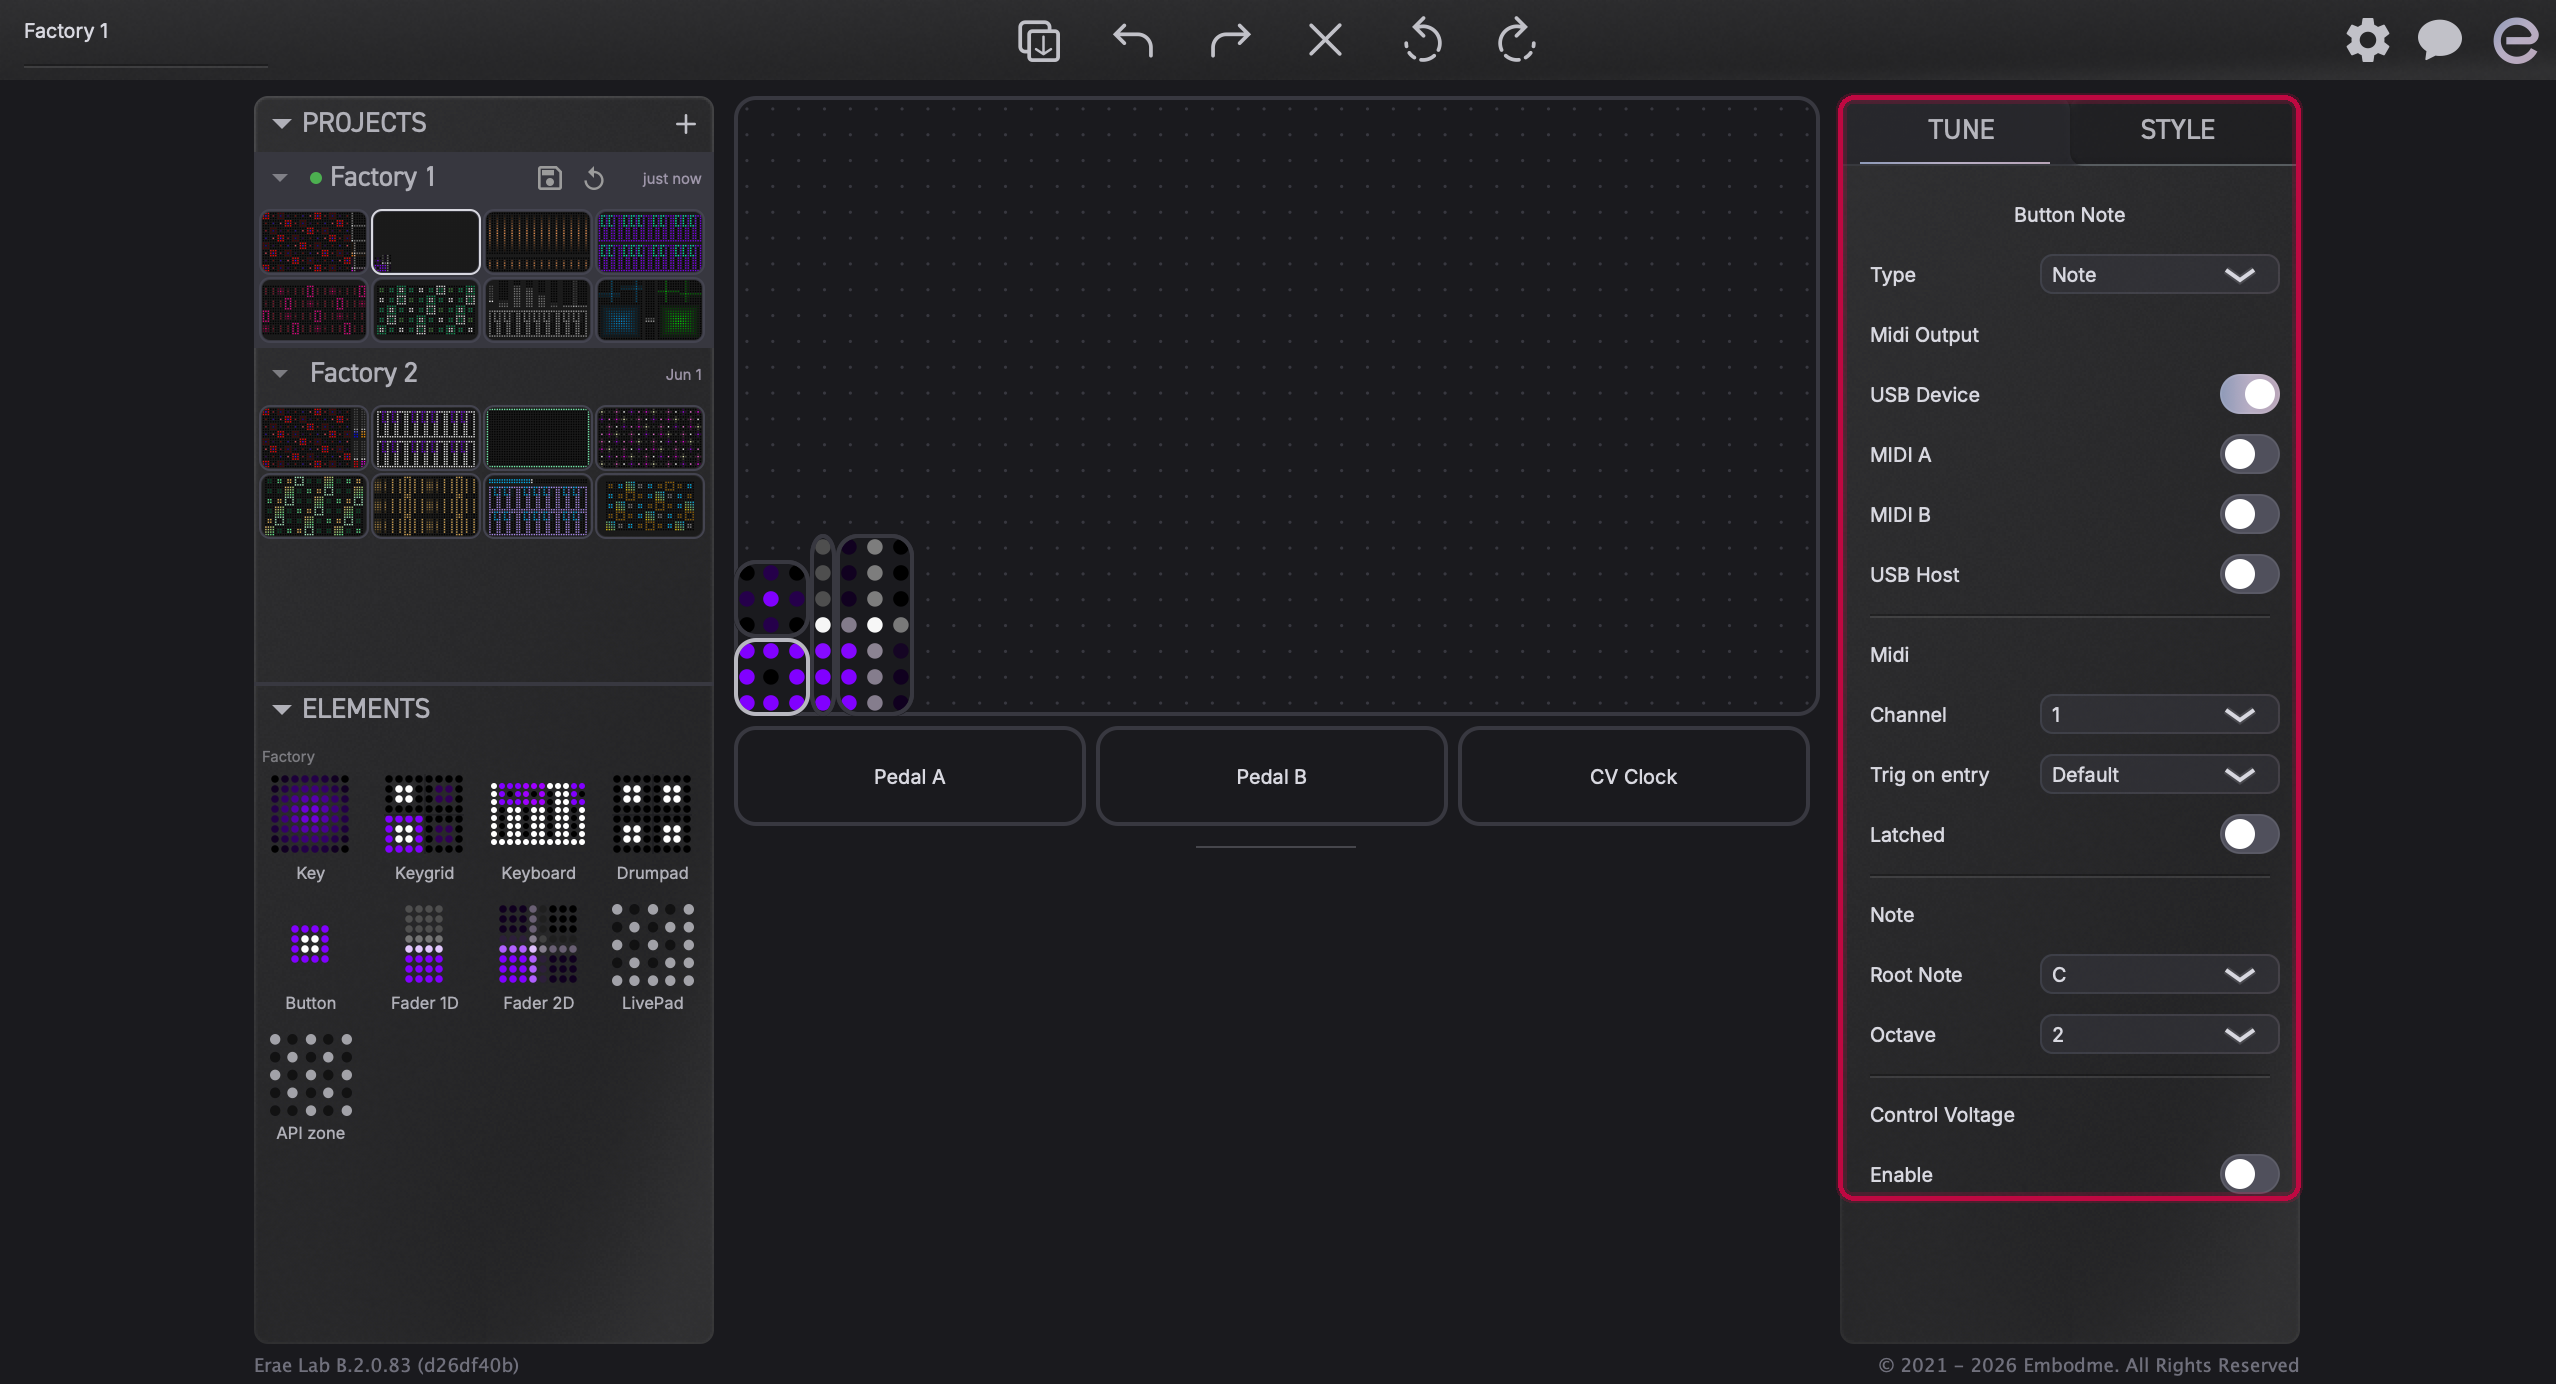
The TUNE tab is where you set up all the control behavior for the selected element:
- MIDI output destination: choose which physical ports receive the element's output: USB Device (your computer), USB Host (devices connected to the "Synth" port), MIDI A, or MIDI B. You can enable multiple destinations at once.
- MIDI channel: which of the 16 MIDI channels this element sends on. Each element has its own independent channel setting.
- Note / CC assignment: the specific note number, or the CC number and behavior (absolute value 0-127, or relative/delta increments).
- Expressivity: for elements that support it (keys, keyboards, faders), pressure response mode (polyphonic or channel pressure).
- Control Voltage (CV): assign the element's output to one of the Erae 2's CV/Gate jacks (Erae 2 only; has no effect if the connected device is an Erae Touch).
Note: The Tune tab covers both MIDI and CV configuration. It is per-element: selecting a different element immediately loads that element's own separate settings.
STYLE tab: colors and animation
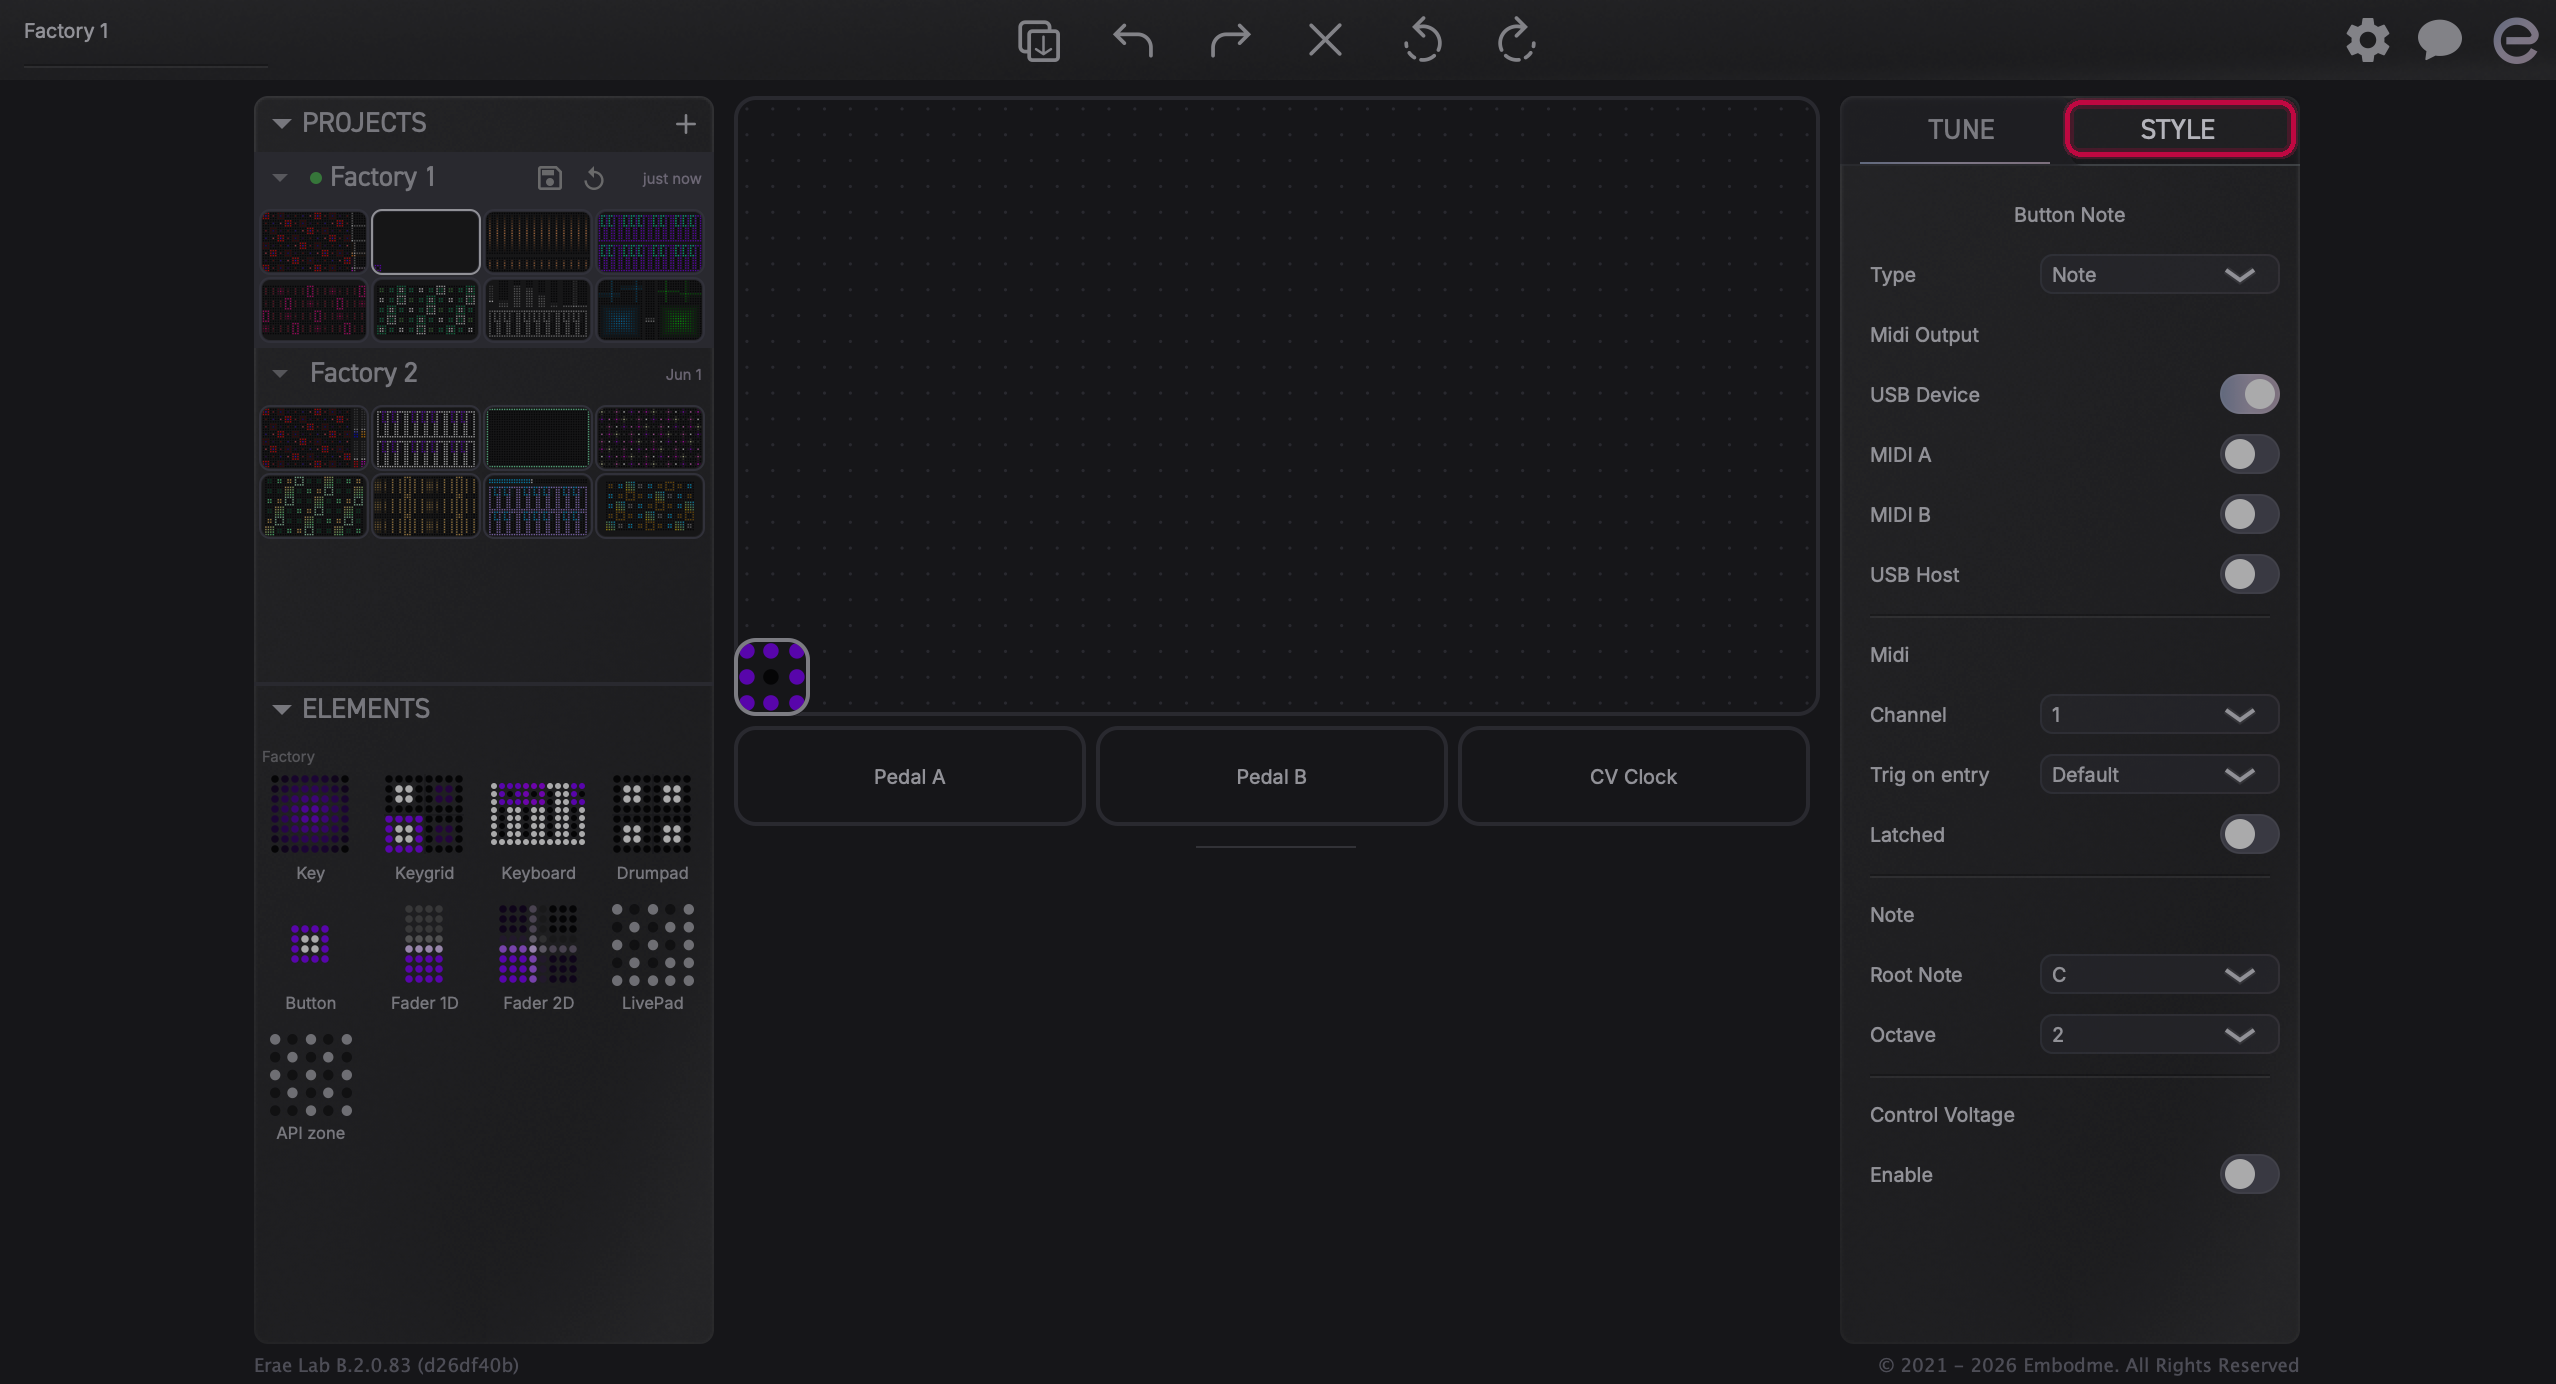
The STYLE tab controls how the element looks on the LED surface:
- Color picker: a triangular picker working in HSL color space. Drag the selector around the triangle to choose hue, saturation, and lightness. The device displays the closest color its LED matrix can produce.
- Gradient mode: choose between solid color, linear gradient (with angle and curve), circular gradient, or rectangular gradient (center vs. edge colors).
- Animation: touch feedback that plays when the element is pressed, such as glow, ripple, halo, or color morph, depending on the element and trigger. You can set the animation color and speed independently from the resting color.
- Keyboard degree selector: for keyboard elements, the STYLE tab also shows which scale degrees and off-scale notes appear and how they are colored. This lets you visually distinguish root notes, thirds, and so on.
Multi-select
When two or more elements are selected, the right panel enters multi-select mode. Properties that have the same value across all selected elements show that value; properties that differ show "Mixed." Changes you make apply to all selected elements simultaneously, which is useful for aligning MIDI channels or applying a consistent color across a group.
Erae Touch vs. Erae 2 in Lab
Erae Lab uses a single codebase and will connect to either hardware. When a device is connected, Lab detects which hardware it is and adjusts accordingly:
- The API Zone element only works on the Erae 2. It is hidden or a no-op when an Erae Touch is connected.
- CV output settings in the TUNE tab are only effective on the Erae 2 (which has physical CV jacks).
- The Erae Touch stores up to 32 layouts per project; the Erae 2 stores up to 8.
If no device is connected, Lab lets you design freely but skips device-specific capability checks until you push to a device.
Where to go next
- Downloading and Installing Erae Lab: get the latest Lab version on macOS, Windows, or Linux.
- Erae Lab System Requirements: check OS compatibility before installing.
- Erae Lab Tune Tab: MIDI, Expressivity & Configuration: detailed reference for every TUNE tab control.
- Erae Lab Style Tab: Color, Light & Degree: detailed reference for the STYLE tab.
- Getting Started with Your Erae 2: if you just unboxed an Erae 2, start here.