Testing for Dead Zones and Ghost Touches
Two distinct hardware faults can make the Erae surface behave erratically: dead zones (areas that do not respond, or respond only to extreme force) and ghost touches (notes or values that trigger with no finger contact). Both are diagnosable in minutes using a visual test you set up yourself in Erae Lab. This article walks you through that test, how to read the results, and what to do next.
Note: These steps apply to both Erae 2 and Erae Touch (MK1). Where behavior differs between the two, it is called out.
Identify your symptom
Dead zone: an area of the surface that produces no response, or requires noticeably more force than the surrounding area to trigger a note. Often reported near the edges or corners of the device. The rest of the surface plays normally.
Ghost touch: notes, pressure values, or CC changes that appear in your DAW with no finger on the surface. Sometimes triggered by hovering close without actually making contact. May be constant or intermittent.
Global sensitivity (not this article): if your entire surface consistently requires more force than you'd like, that is a sensitivity setting to adjust, not a localized hardware fault. On Erae 2, use the on-device Sensitivity setting (Settings menu, four levels from XSensitive to XSafe). On Erae Touch (MK1), sensitivity is adjusted from Erae Lab rather than on the device. See Calibrating Your Erae Surface for both.
Before you test: quick baseline checks
Run these steps first to rule out software causes.
-
Update your firmware. Connect your device to Erae Lab; it checks for and installs firmware updates automatically. Firmware updates include pressure-processing improvements, and some sensitivity issues that resemble dead zones resolve after updating. See Updating Your Erae 2 Firmware for the full procedure.
-
Check your sensitivity setting. On Erae 2, open the Settings menu on the device and confirm Sensitivity is not set to XSafe (the firmest option). On Erae Touch (MK1), check the sensitivity control in Erae Lab. An unusually firm setting raises the activation floor across the whole surface, which can make weaker cells look like dead zones even though nothing is faulty.
-
Test USB isolation. Certain USB hubs and power adapters introduce electrical noise that can cause sporadic false triggers. On Erae 2, connect your computer directly to the Device port on the rear of the unit (not through a hub), use the included USB-C cable, and disconnect any gear from the Host port that is not strictly necessary. Then re-test.
-
Power source affects LED brightness, not touch sensitivity. Erae 2 has three USB-C ports on the rear panel: Power (the main power input), Device (connects to your computer, carrying the Main and MPE USB-MIDI ports), and Host (for connected USB-MIDI gear, supplying up to 0.5 A). For full power, plug the power supply into the Power port. The device can still run in Low Power mode when powered from another port, such as bus power over the Device port, which brings reduced LED brightness, some features limited, and a "Low Power" warning at boot, but this does not reduce pressure-sensing response, so it will not by itself explain a dead zone or ghost touch. If you want to rule it out anyway, connect the Power port to a laptop-class USB-C PD adapter for the duration of this test.
Set up the Halo diagnostic layout
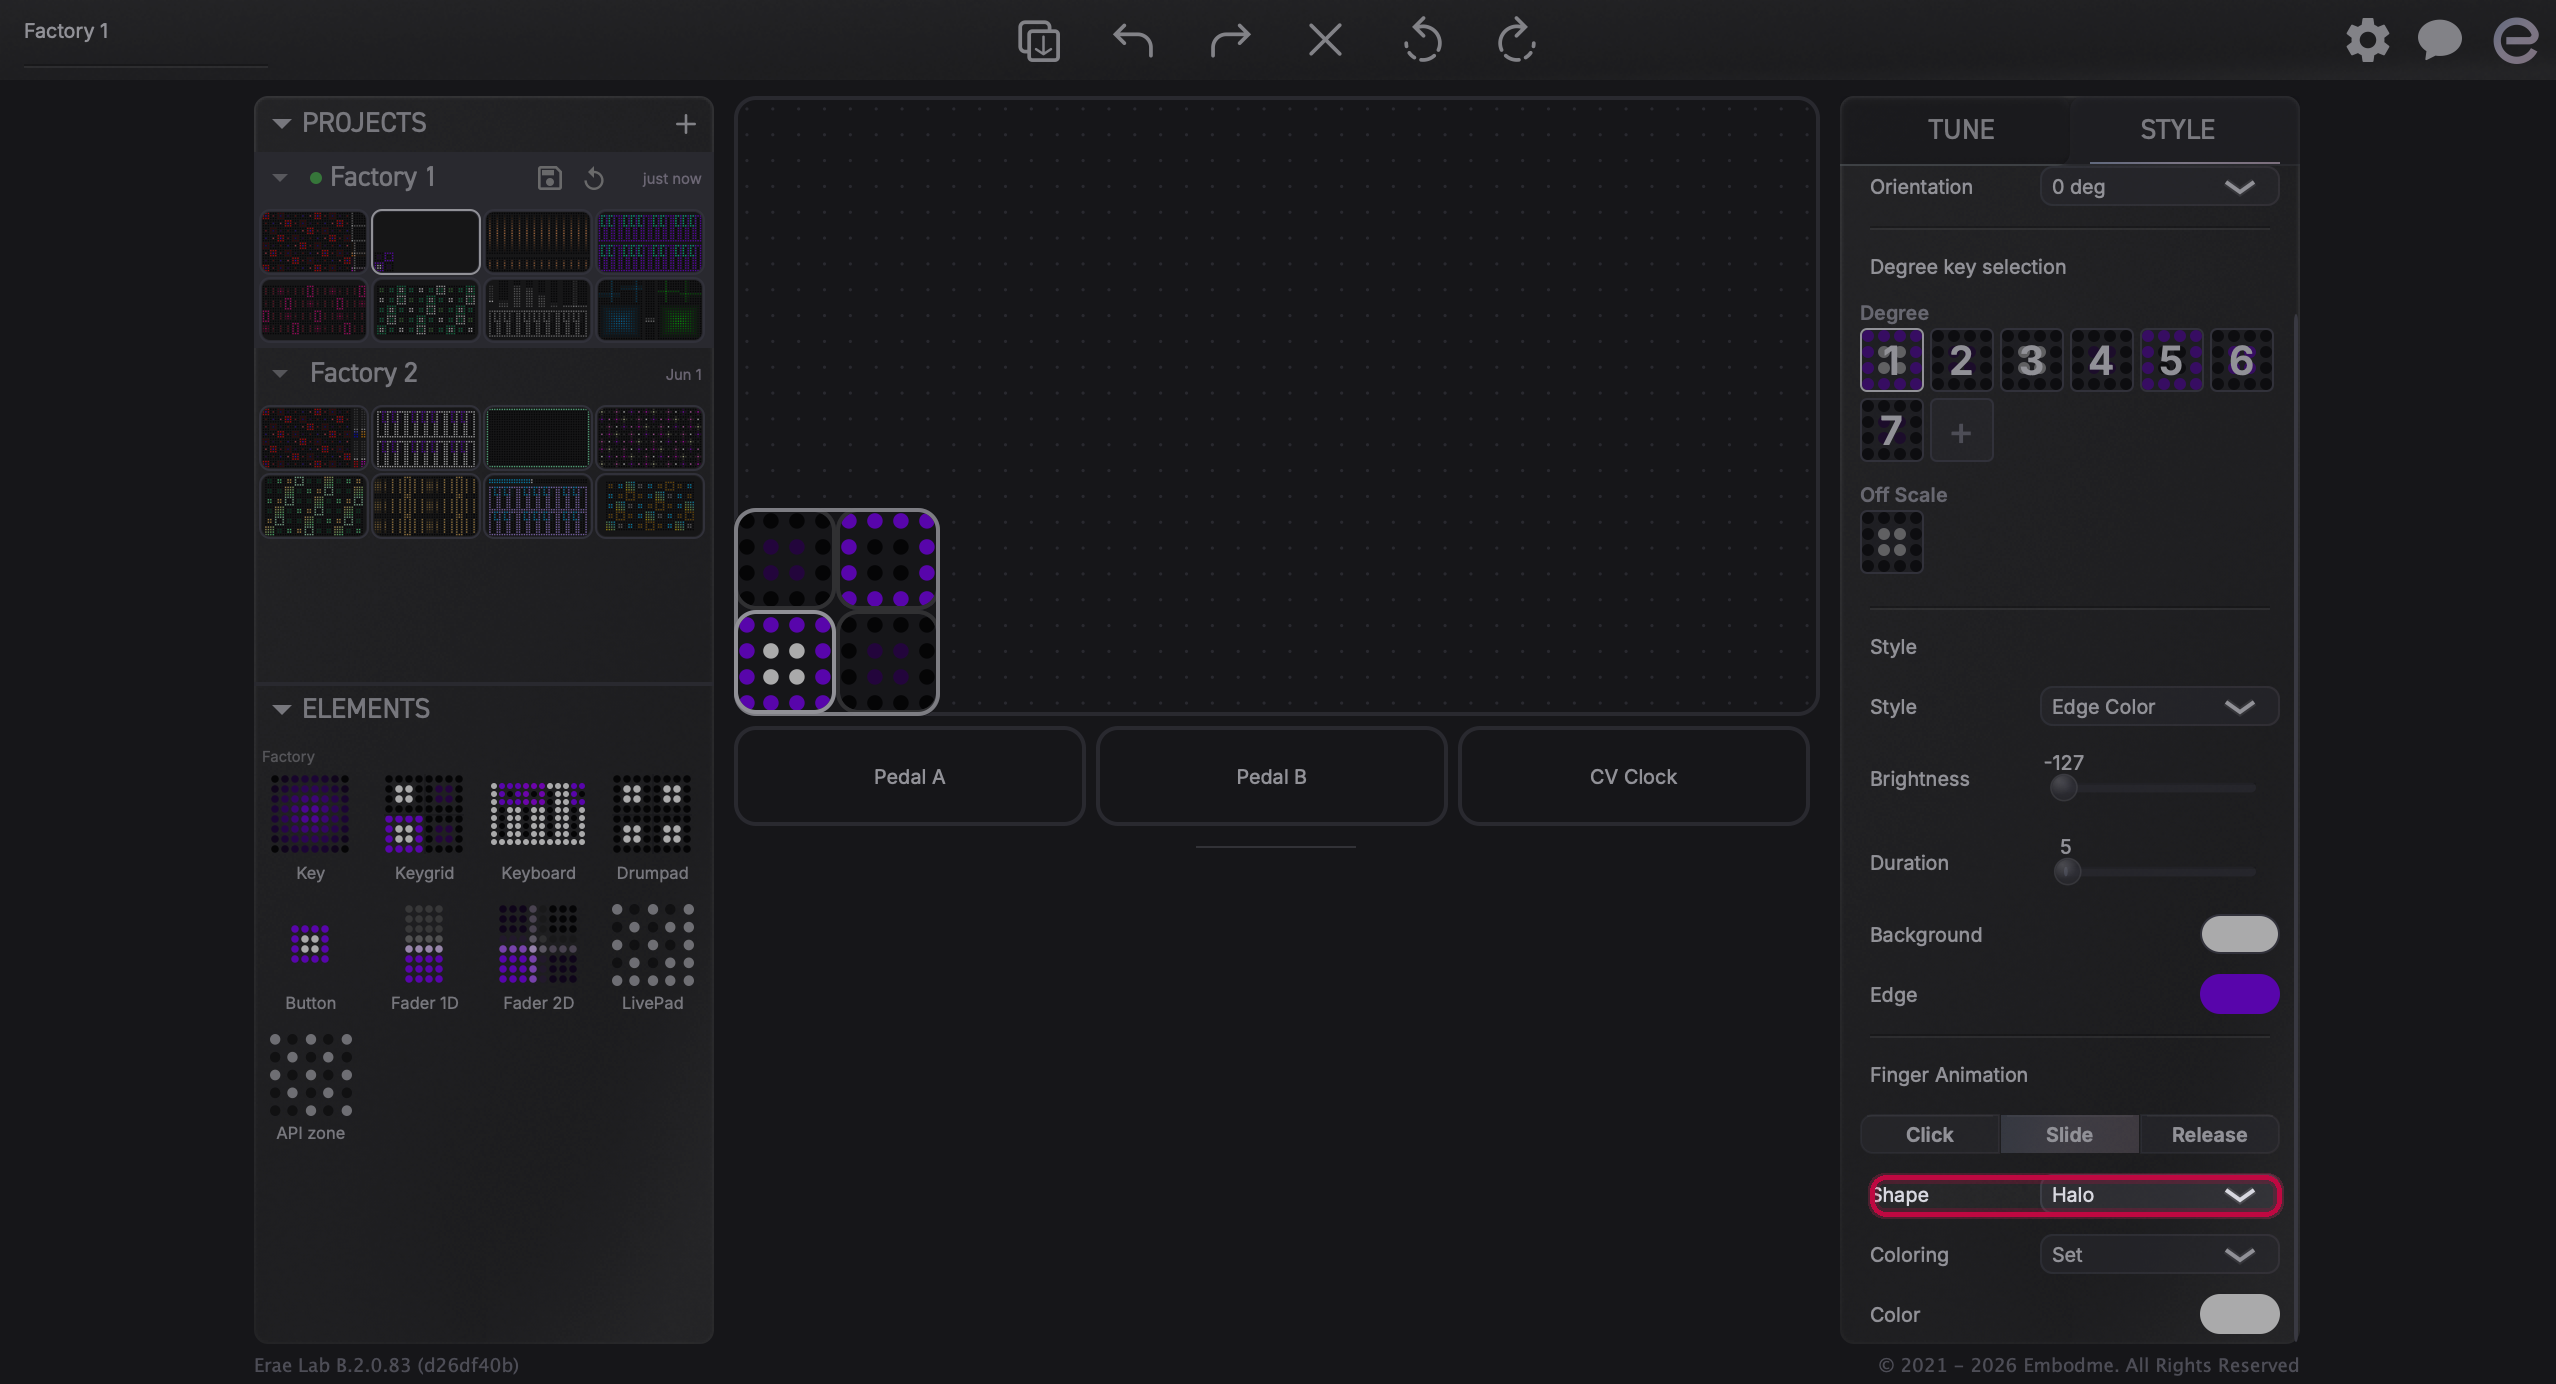
The diagnostic uses a specific animation style in Erae Lab called Halo (found in the Slide animation section of the Style tab). When active, the Halo animation draws a pressure-proportional ring on the LED surface directly under your finger: a small ring for a light touch, a large ring for firm pressure, and nothing at all when no contact is detected. This makes dead zones and ghost touches easy to see.
Note: Do not overwrite a working layout. Create a new, temporary layout for this test.
Steps:
-
Open Erae Lab. In the left sidebar, create a new project (or open an existing one and add a new layout tab for the test).
-
On the canvas, add a single Keyboard element and resize it to fill the entire surface: drag its handles to the maximum width and height so it covers all the LED area edge to edge.

-
Click the element to select it. In the right panel, switch to the Style tab.
-
In the Animation section, click Slide (the middle button in the Click / Slide / Release row).
-
From the Shape dropdown in the Slide animation settings, select Halo.
-
Set the Color to white or another bright color that will stand out against the element's background color.
-
Click Send (or save and sync) to push the layout to your device.
-
Dim your room lights if possible: the ring is easier to read against a dark background.
What a healthy surface looks like: touch anywhere on the pad and a bright ring appears immediately at your fingertip. Press harder and the ring expands. Lift your finger and the ring disappears quickly and completely.
Run the dead-zone test
-
With the diagnostic layout active on your device, press slowly across the entire surface in a grid pattern (left to right, top to bottom, then back again). Use consistent, normal playing pressure at each position, not maximum force.
-
Watch the LED surface on your device. A ring should appear at every position you press, and its size should feel roughly consistent for the same applied force across the surface.
-
Some cell-to-cell variation in exact ring size is normal and not worth chasing. Focus on positions where:
- No ring appears at all, even with firm pressure.
- The ring is clearly and consistently much smaller than neighboring areas at the same applied force, not just slightly different.
-
If you find a suspect area, narrow it down. Press in a small cluster of positions around it to locate the extent of the affected zone. A genuine hardware fault typically covers a cluster of adjacent positions rather than a single cell.
-
Record the evidence. Take a short video showing your finger pressing first on a healthy area (ring appears normally) and then on the affected area (ring does not appear, or is clearly smaller for the same force). Support will ask for this video if the issue needs to go further.
Run the ghost-touch test
-
With the diagnostic layout active and no hands near the device, watch the LED surface for any ring that appears on its own.
-
If a ring appears, note its position on the surface. The ring is centered on the triggering cell.
-
Slowly lower your hand toward the surface without making contact. If the ring appears before your finger touches, the cell is responding to proximity; note this, as it points to a sensor or noise issue rather than a simple software setting.
-
Repeat the USB isolation check from the baseline section: disconnect all non-essential devices, try a different port, and try a different cable. If the ghost touch disappears with a different USB configuration, note that finding too.
-
Record the evidence. Record a video showing the ghost-touch ring appearing with no hand nearby. Note whether it is constant or intermittent, and whether it changes when you change the USB connection.
Read your results
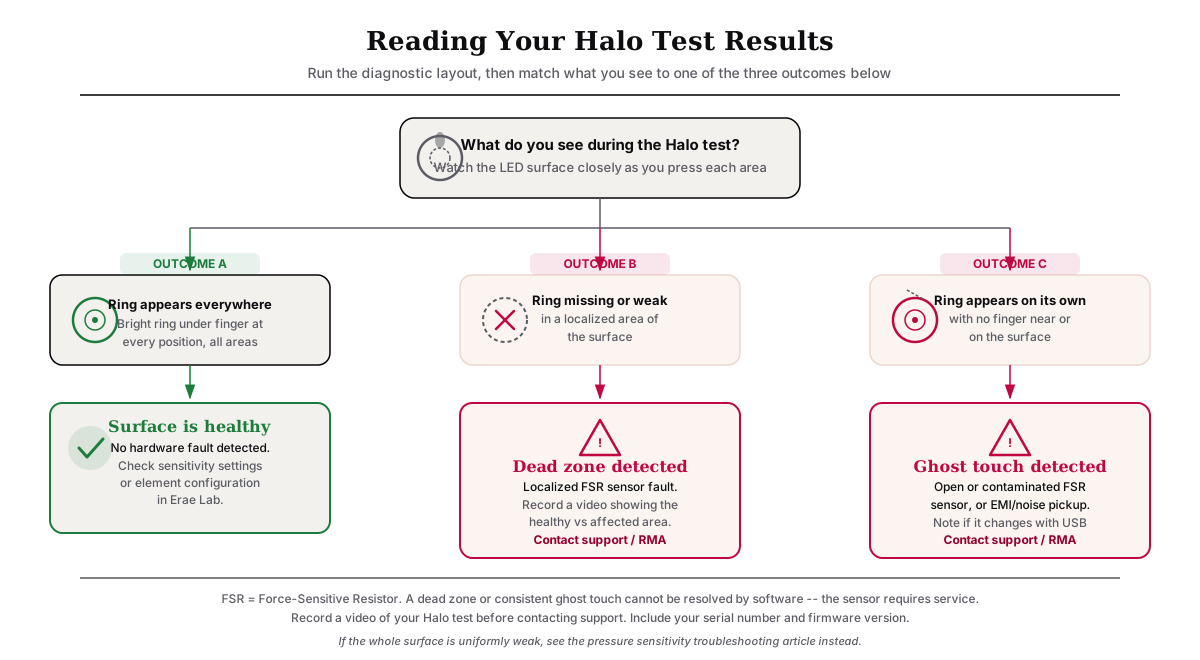
| What you observed | What it means | Next step |
|---|---|---|
| Ring appears everywhere, sized consistently for the same force | Surface is healthy | No action needed; minor cell-to-cell variation is normal |
| Ring is missing, or clearly and consistently smaller in one localized area | Possible localized sensor issue | Contact support with your test video |
| Ring appears on its own (consistent) | Possible sensor or contact issue | Contact support with your test video |
| Ring appears on its own (intermittent, changes with USB) | Likely electrical noise pickup | Try a different cable, port, or power supply; if it persists, contact support |
| Whole surface uniformly feels stiff or overly sensitive | Sensitivity setting, not a localized fault | Adjust sensitivity (Erae 2: on-device Settings; MK1: Erae Lab), see Calibrating Your Erae Surface |
There is no manual calibration step
You may have searched for a "calibrate" screen or button sequence. There is none, on either the Erae 2 or the Erae Touch. Calibration runs automatically at startup and is maintained through firmware updates. There is no user-accessible calibration ritual. See Calibrating Your Erae Surface for what you can actually adjust (sensitivity and, on Erae 2, the velocity curve).
If the Halo test confirms a localized dead zone or a consistent ghost touch, no settings change or calibration step will resolve it on its own. Contact support so they can advise on next steps.
Contact support
If your test points to a hardware issue, contact Embodme support. Include:
- Your serial number (on the bottom of the device).
- Your firmware version (visible in Erae Lab when the device is connected).
- The video you recorded during the Halo test.
- Whether the fault is consistent or intermittent.
- What you already tried (firmware update, sensitivity check, USB isolation).
Use the in-app bug reporter in Erae Lab: it automatically attaches the diagnostic information support needs, so it's the fastest way to get help. You can also email [email protected].